Actions Overview
Actions allow you to update records, send communications, perform math operations, start and stop Automations, or notify team members.
Types of Actions
Activities
Schedule Activity - Schedule an activity, assign it to a team member, and set a due date. If needed, add a notification (via text or email) to remind the team member of the due date.
- Choose Activity
- Assign To
- Round Robin (Team Member of Any Role) - assigns the activity round robin to all team members in the account
- Round Robin (Team Member of Specific Role) - assigns the activity round robin to only team members of the role specified
- Round Robin (Select Team Members) - assigns the activity round robin to only the team members selected
- Owner - assigns the activity to the record's owner
- Note: This option is not available on contacts
- Specific Team Member - assigns the activity to the specified team member
- Custom Team Selector Field - assigns the activity to the team member selected on the record for the specified custom field
- Example: An object has a Custom Team Selector Field for both Account Executive and Sales Development Representative. The automation will give options to assign the activity to the Account Executive or to the Sales Development Representative.
- Last Active Team Member (Any Role) - assigns the activity to the last active team member on the record from any role
- Last Active Team Member (Specific Role) - assigns the activity to the last active team member on the record from only the specified role
- Specific Role - assigns the activity to the specified role
- Note: This will not assign the activity to a person, only to the role.
- Set the Due Date
- Include any notes (if applicable)
- Add Notification (if applicable)
- Save
Automations
Modify Automations - Start, pause, or cancel specific automations on the same object.
This step is helpful when you want to automate a series of outreaches or campaigns. This step is particularly useful when paired with goal steps.
Start Automations
- Choose Automations to start
- Note: You can start multiple automations at once
- Select if you would like records with this existing paused automation to resume instead of starting a new automation at step 1
- Click Save
Pause Automations
- Choose Automations to pause
- Note: You can pause multiple automations at once
- Click Save
Cancel Automations
- Choose Automations to cancel
- Note: You can cancel multiple automations at once
- Click Save
Go To Automation Step - Skip to a step in an automation.
This step is helpful when you are using multiple branches that will eventually need to merge back together.
- Choose which step to go to
- Click Save
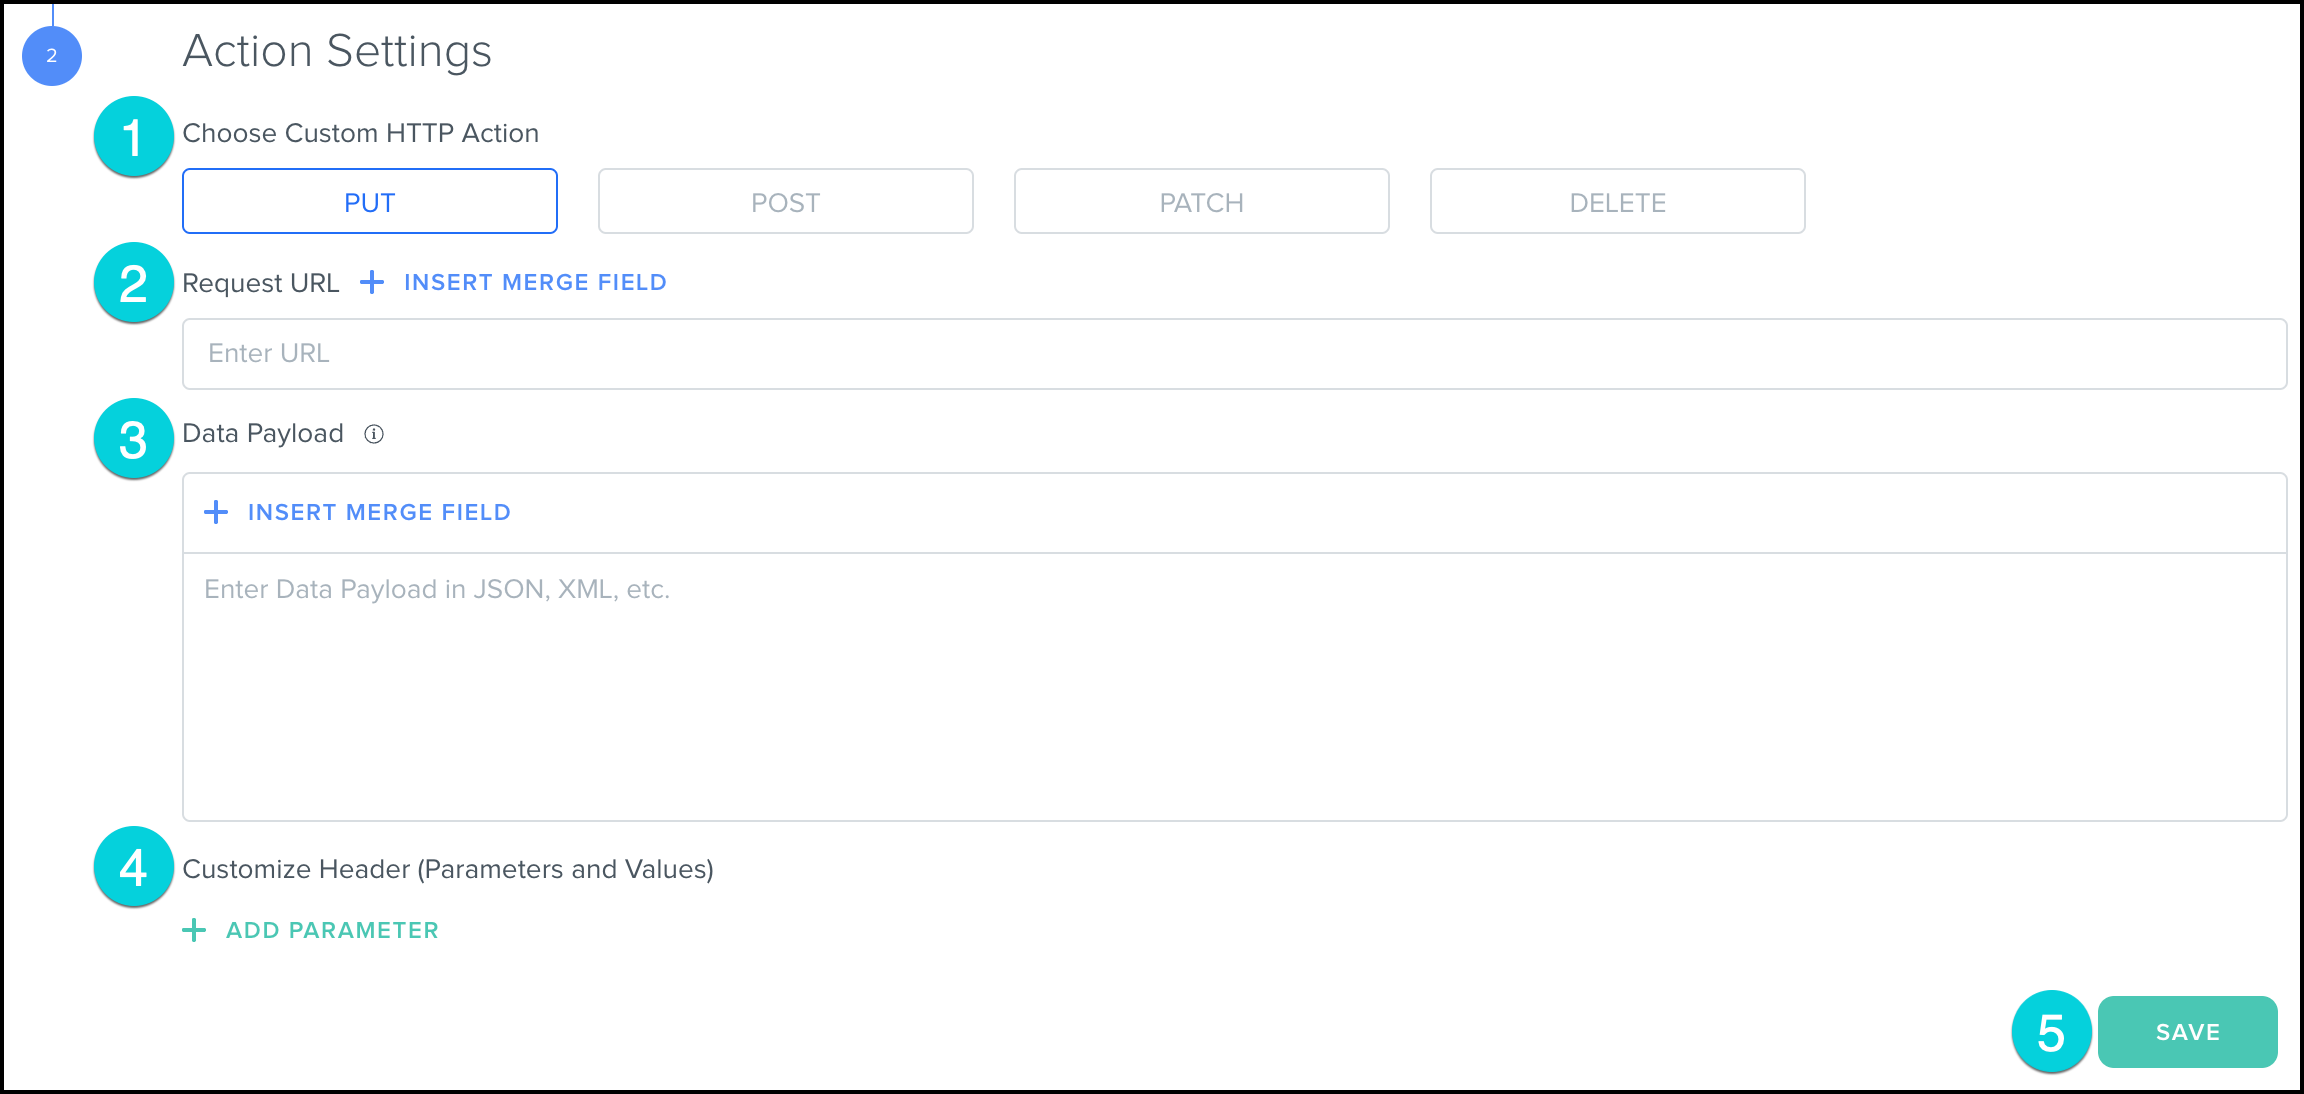
External HTTP Requests - Send an external API request.
External HTTP requests are typically created by technical users of the system. This action allows for sending data from Kizen to another system. The step allows for POST, PUT, PATCH, AND DELETE requests to a specified URL.
- Choose Custom HTTP Action
- PUT - A PUT request is used to update a specific resource and typically replaces whatever exists at the target URL
- POST - A POST request sends data to a specified URL to create a resource
- PATCH - A PATCH request partially updates a specified resource
- DELETE - A DELETE request will delete the specified resource
- Enter the Request URL
- This URL can include "merge fields" which gives the user access to the data on the record this automation execution is running on
- Data Payload
- This data payload can be in JSON, XML, or any other specified format that is needed
- The payload can include "merge fields" which gives the user access to the data on the record this automation execution is running on
- Customize Header (Parameters and Values)
- You are able to add as many headers as you'd like to this request
- This is typically used to authenticate your request to a third party service or specify your payload format
- Click Save
Fields
Change Field Value - Add or remove the value of a specified field on the record.
Specific Value - This value type allows you to enter a static value for the field. Anytime the automation is run, the field will be updated with the value entered here.
- Choose the Field to Change
- Choose Specific Value as the Value Type
- Enter the New Field Value
- Click Save
Field Value on a Primary Related Object (Variable) - this value type allows you to pull the field value for the same field type from another object's record.
- Choose the Field Value to Change
- Choose Field Value on a Primary Related Object (Variable) as the Value Type
- Choose a Related Object
- Choose a Field Value to pull from
- Only fields on the related object of the same field type will appear as options. For example, If you want to change the email address on the automation's object to an email address on a related contact's record, only email address fields will appear in the dropdown options in the automation step.
- Click Save
Math Operators - Add, subtract, multiply, or divide using constant numbers and/or custom fields.
- Choose the Equation Type
- Choose the field to update
- Only Number, Price, and Percentage fields can be used.
- Add Elements
- Multiple elements can be added using custom fields and constant numbers.
- Click Save
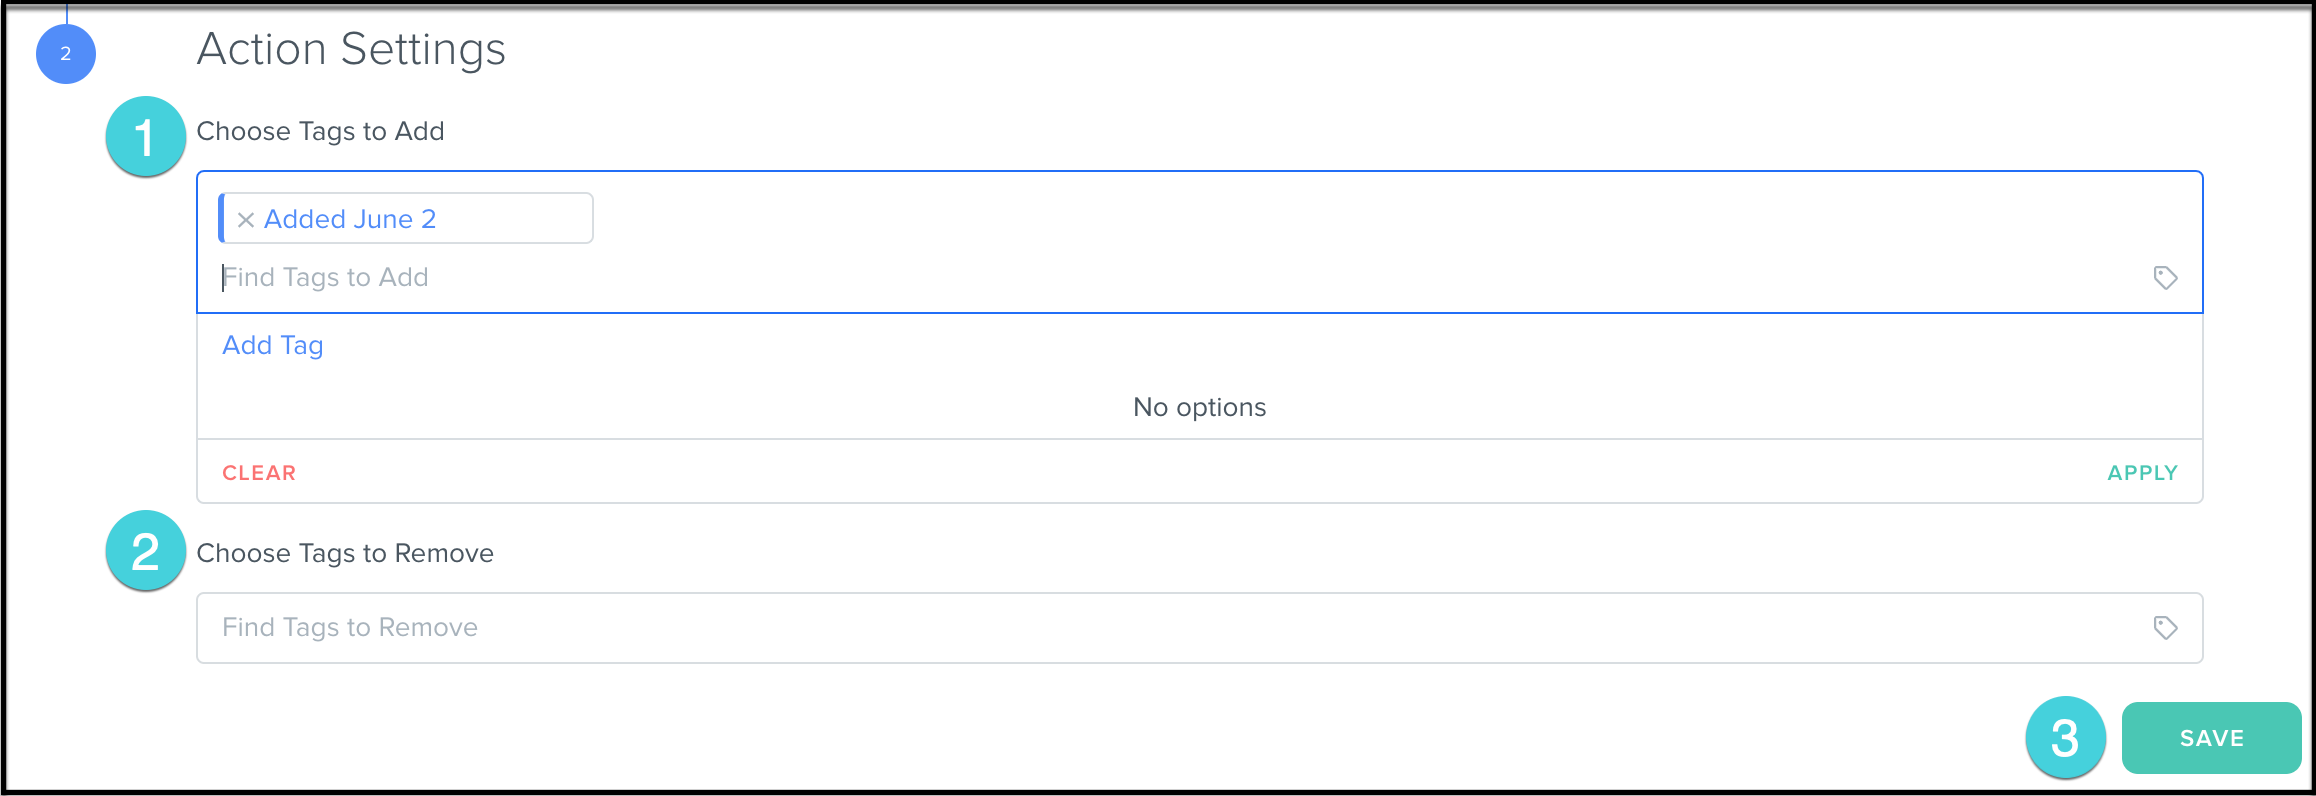
Change Tags - Add or remove tags on a record.
- Choose Tags to Add
- Choose from tags previously created or Add a New Tag
- Note: You can add multiple tags at once
- Choose Tags to Remove
- Choose from tags previously created or Add a New Tag
- Note: You can add multiple tags at once
- Click Save
Related Objects
Create Related Entity - Create a new record on a related object.
- Choose the related object via a Relationship Field
- Enter the name for the new record
- The name can include "merge fields" which gives the user access to the data on the record this automation execution is running on.
- Click Save
Modify Related Entity - Modify a record on a related object.
Specific Value - This value type allows you to enter a static value for the field.
- Choose the related object to modify
- Choose which relationship fields' records to modify
- Note: You can modify multiple relationship fields' records at once.
- Choose which field(s) to update
- For each field, select Specific Value as the Value Type
- Enter the desired value
- Choose a Field Resolution
- Overwrite Field will replace any existing value for the selected field with the new value.
- Only Add Options will only add the selected option to the existing value for the selected field.
- Click Save
Deal Field Value (Variable) - This value type allows you to push the field value for the same field type the related records.
- Choose the related object to modify
- Choose which relationship fields' records to modify
- Note: You can modify multiple relationship fields' records at once.
- Choose which field(s) to update
- For each field, select Deal Field Value (Variable) as the Value Type
- Select which field value should be pushed to the related record(s)
- Choose a Field Resolution
- Overwrite Field will replace any existing value for the selected field with the new value.
- Only Add Options will only add the selected option to the existing value for the selected field.
- Add rules, if applicable
- Note: Rules will apply for Dropdown, Radio Button, Dynamic Tags, Rating, Status, Yes/No Question, Relationship, and Checkboxes field types.
- Click Save
Send Email to Related Contact(s) - Send an email to related contacts on the object's record.
- Choose which Related Contact(s) to send the email to
- Note: You can send to multiple contacts/contact types at once.
- Choose Email to Send
- Select an email from your Library Templates or Create an email from scratch
- Click Save
Modify Related Automations - Start, pause, or cancel specific automations on a related object's record(s).
Start Automations
- Choose which object to modify automations on
- Choose which relationship fields' records to modify
- Note: You can modify multiple relationship fields' records at once.
- Choose Automations to start
- Note: You can start multiple automations at once
- Select if you would like records with this existing paused automation to resume instead of starting a new automation at step 1.
- Click Save
Pause Automations
- Choose which object to modify automations on
- Choose which relationship fields' records to modify
- Note: You can modify multiple relationship fields' records at once.
- Choose Automations to pause
- Note: You can pause multiple automations at once
- Click Save
Cancel Automations
- Choose which object to modify automations on
- Choose which relationship fields' records to modify
- Note: You can modify multiple relationship fields' records at once.
- Choose Automations to cancel
- Note: You can cancel multiple automations at once
- Click Save
Messages
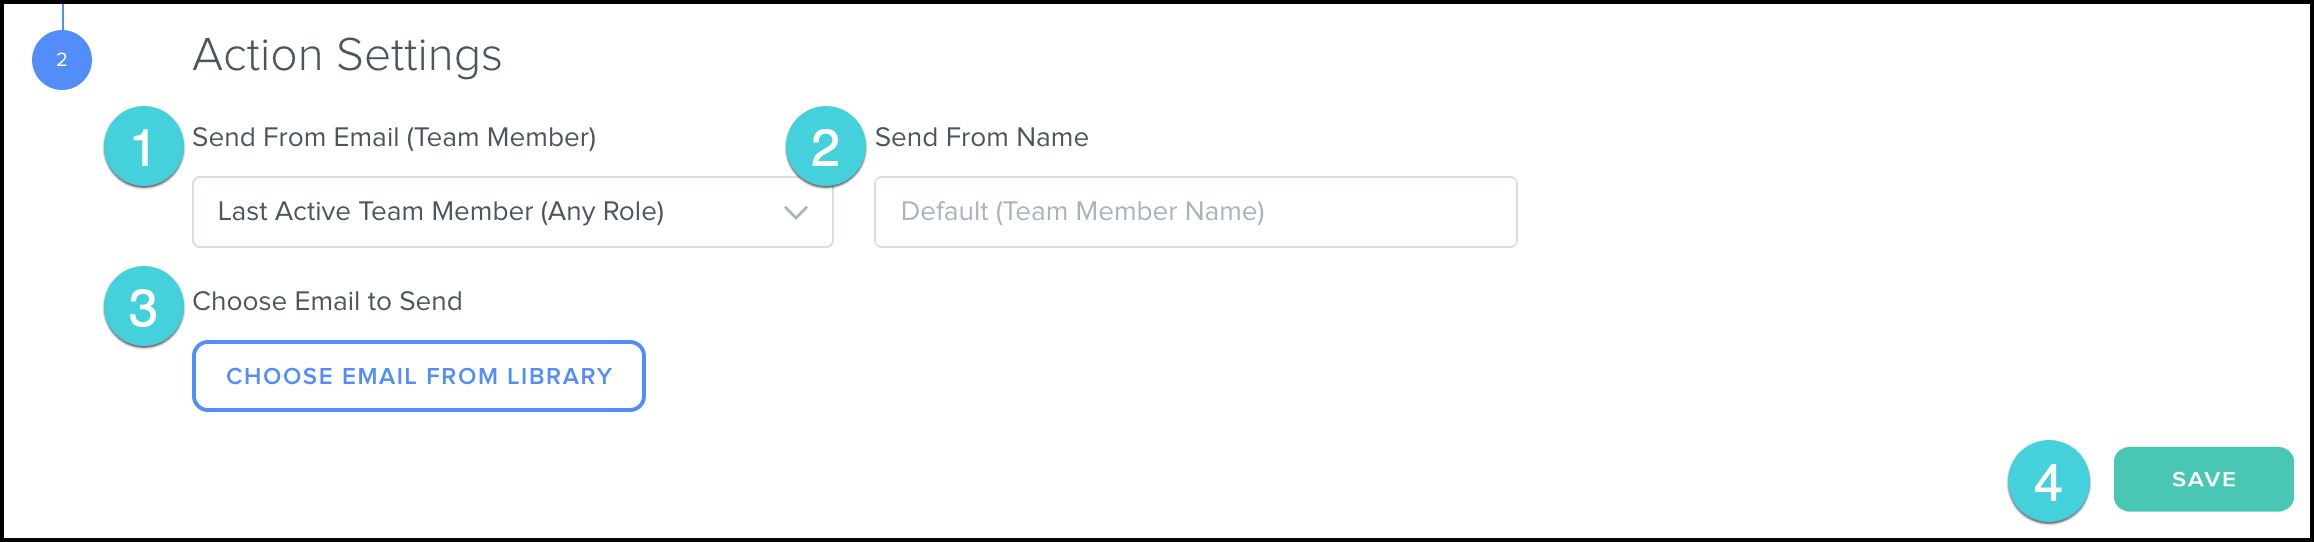
Send Email - Send an email to the contact. Emails can be selected from the Library or created from scratch.
- Select which team member the email should be sent from
- Update the Send From Name (if applicable)
- Choose Email to Send
- Select an email from your Library Templates or Create an email from scratch
- Click Save
Hint
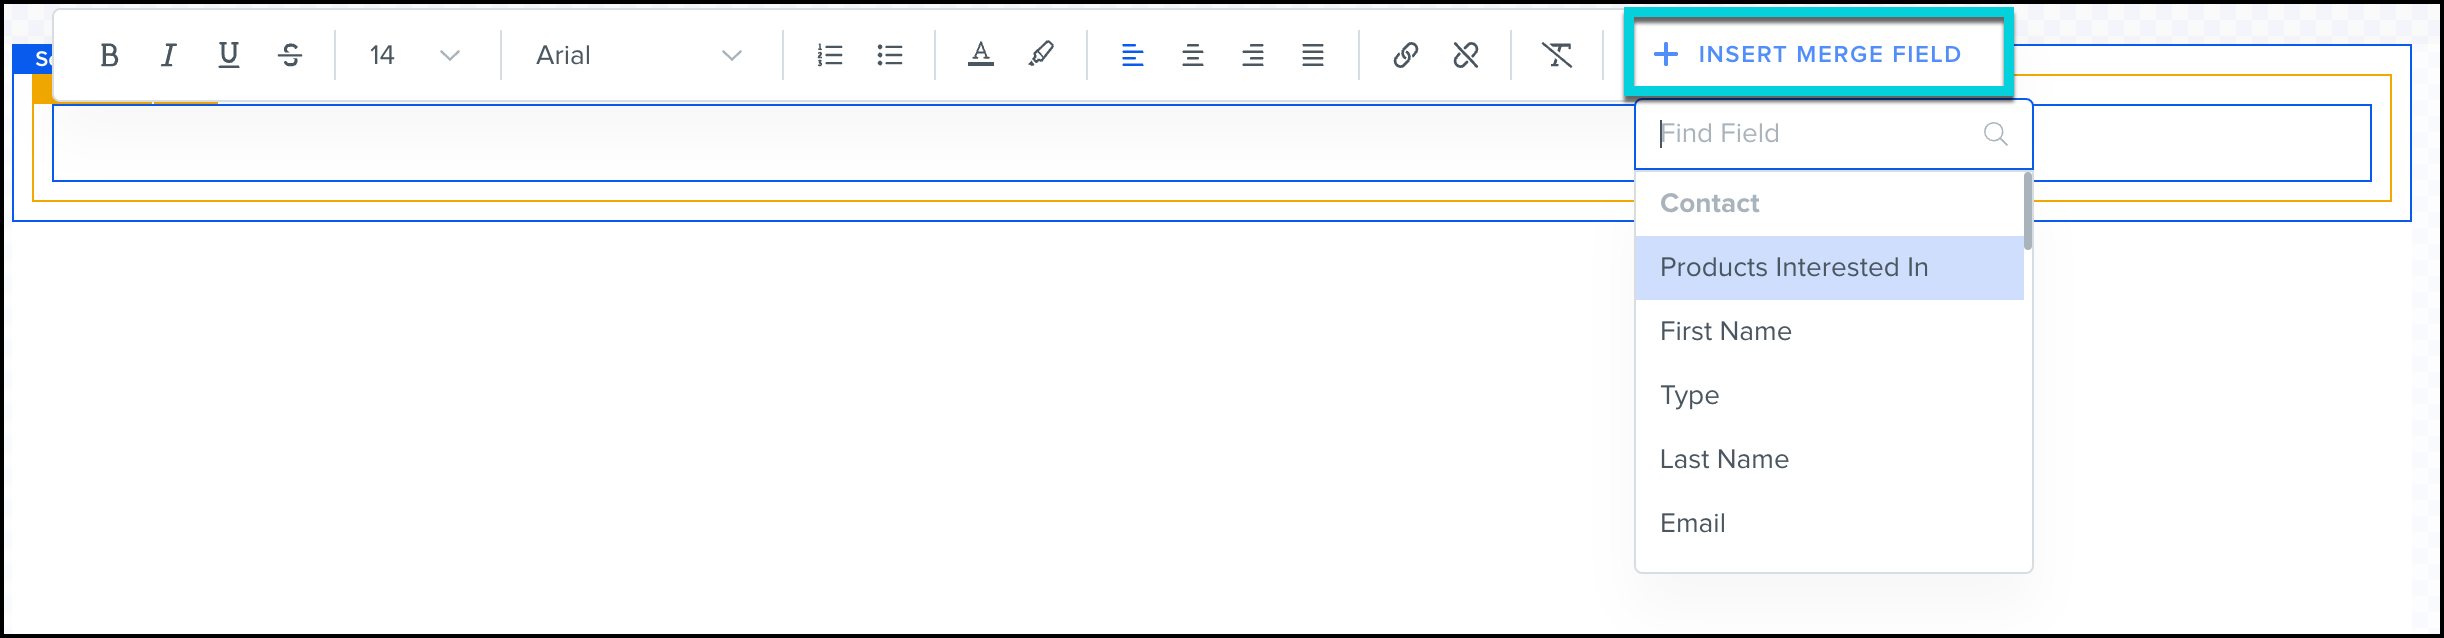
Click on Insert Merge Field to personalize your email to the contact.

Send Text Message - Send a personalized text message to the contact. Text Messages are often used in automations for sending contacts reminders about upcoming events.
- Create the body of your text message
- Save

Hint
Click on Insert Merge Field to personalize your text message to the contact.

Team
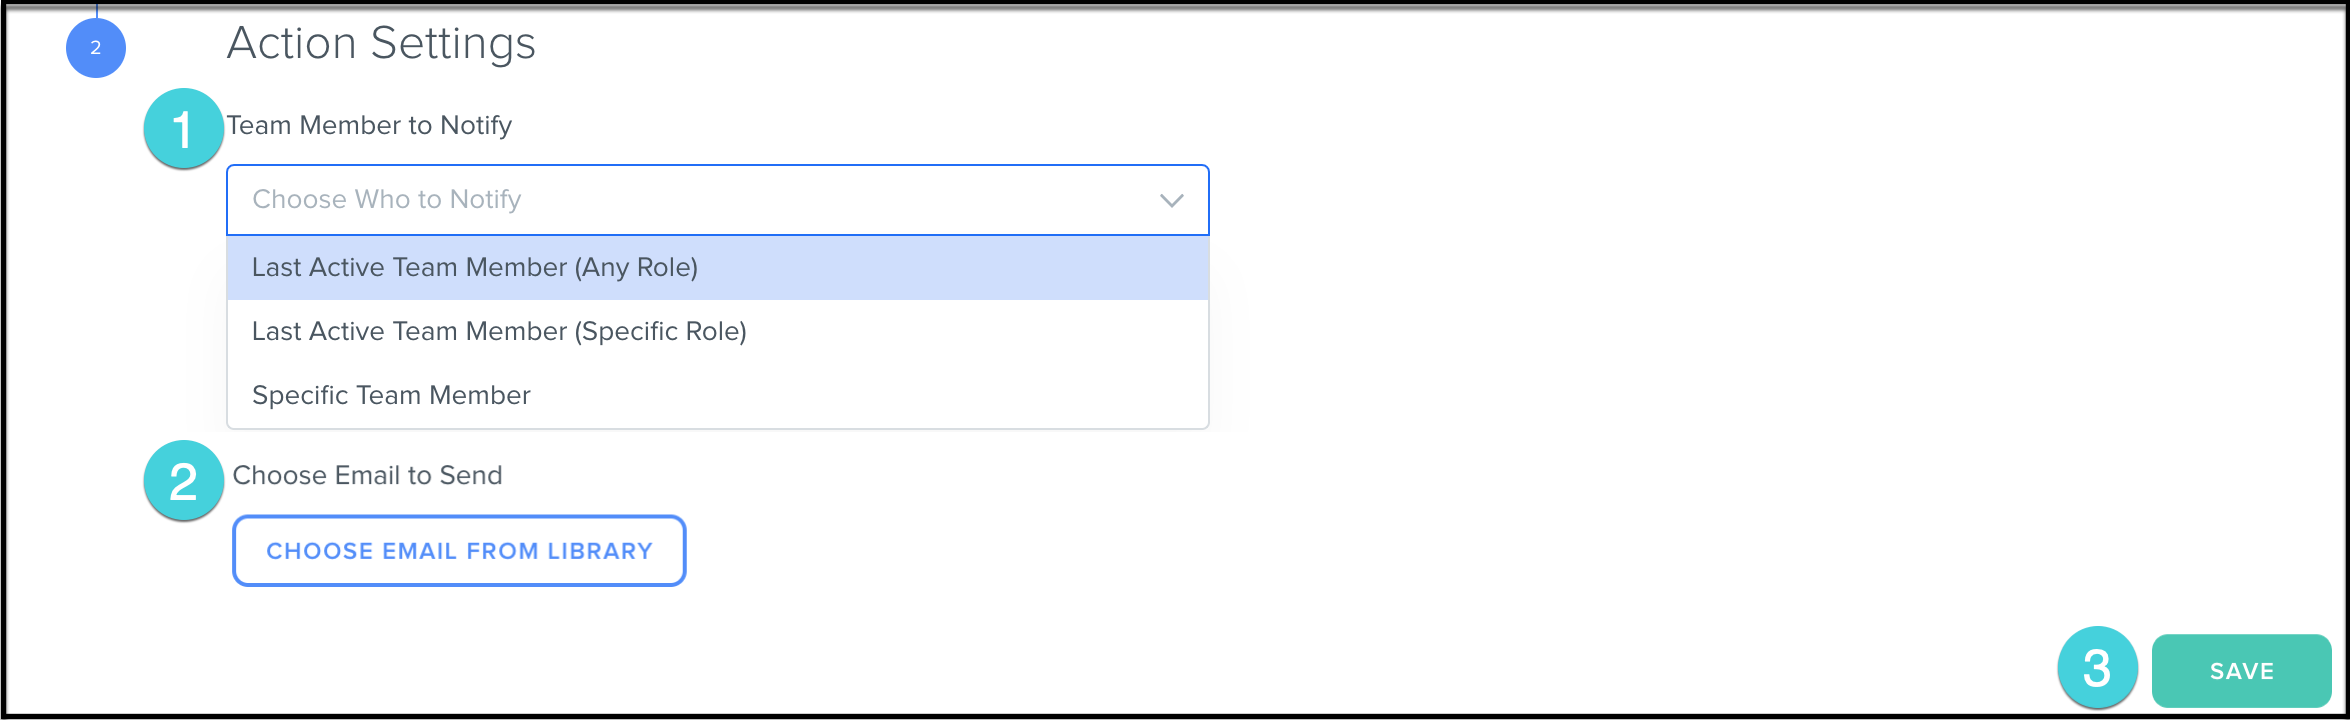
Notification (Email) - Notify a team member via email.
- Select the Team Member to Notify
- Choose Email to Send
- Select an email from your Library Templates or Create an email from scratch
- Click Save
Hint
Click on Insert Merge Field to personalize your email to the Team Member.
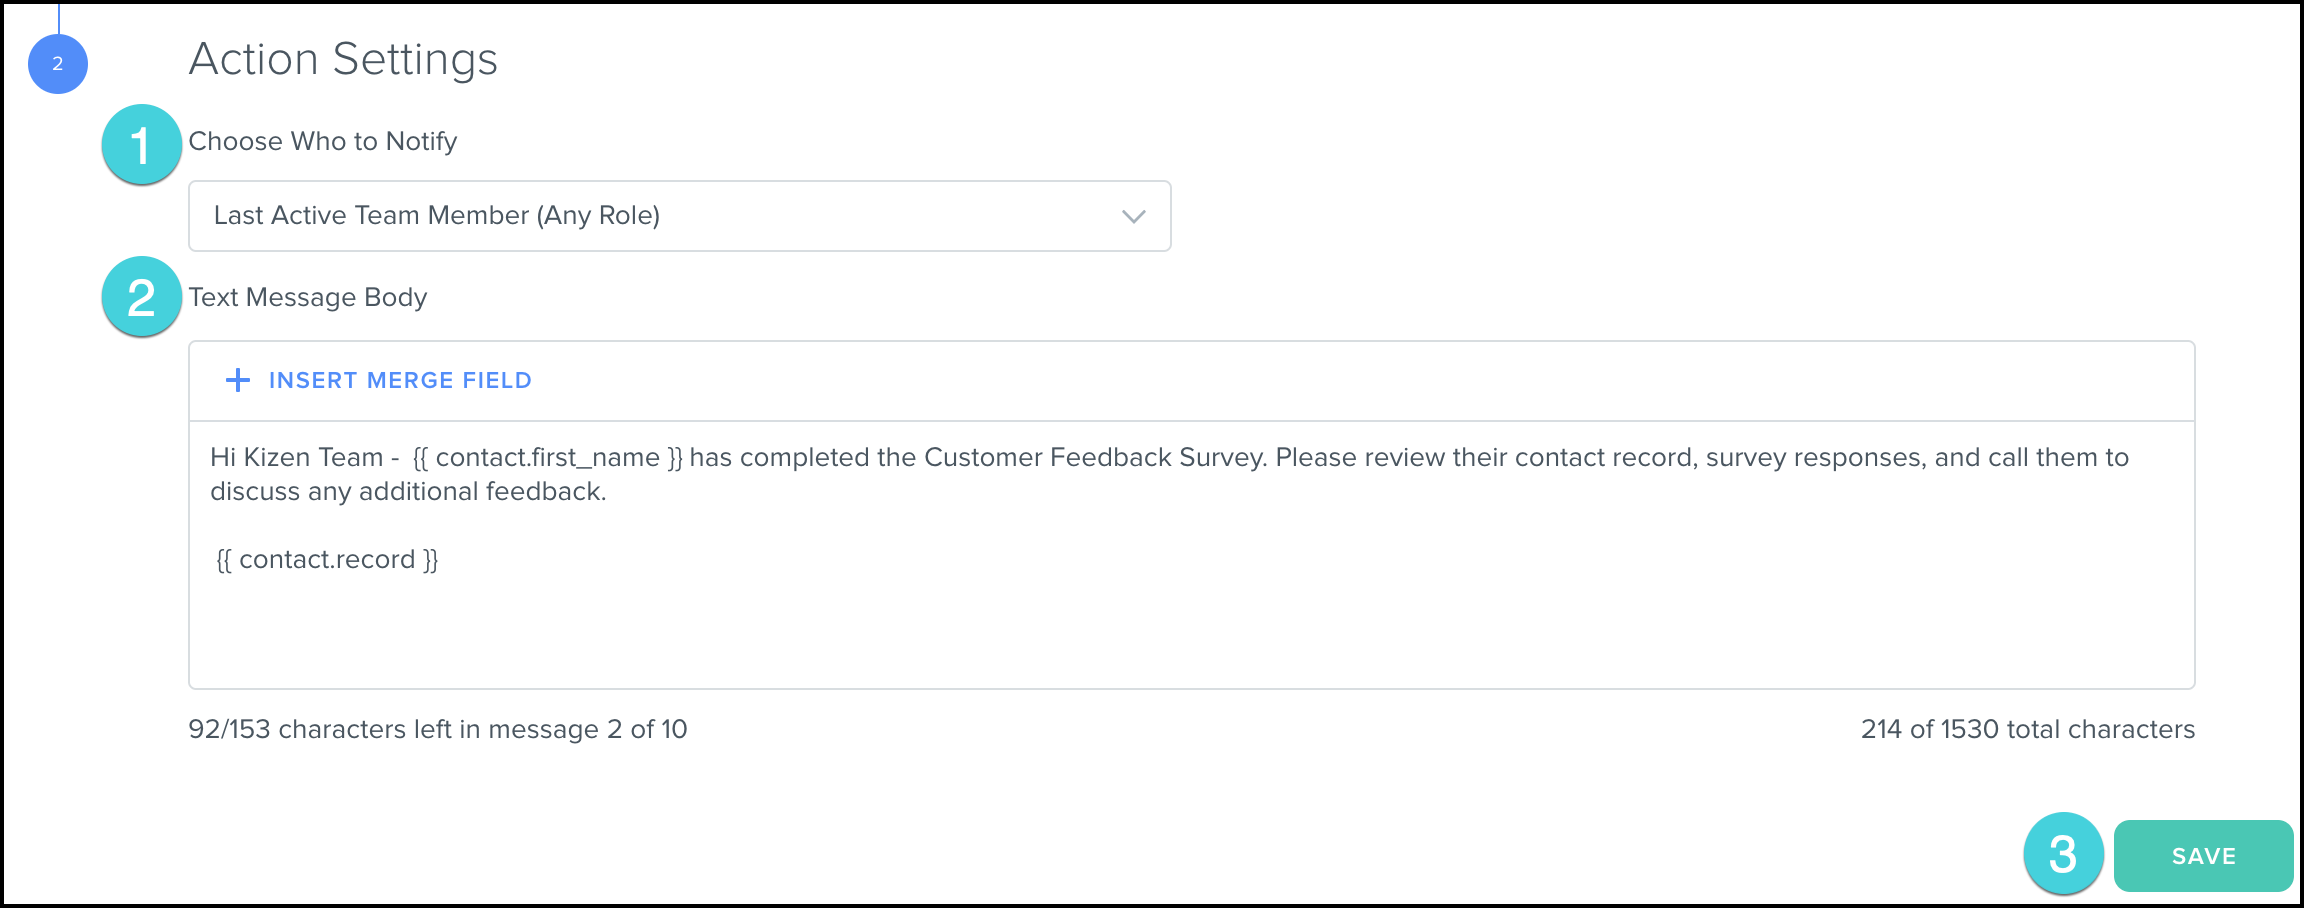
Notification (Text) - Notify a team member via text.
- Select the Team Member to Notify
- Create the Text Message Body
- Click Save
Hint
Click on Insert Merge Field to personalize your text to the Team Member.
Assign Team Member - Assign a team member to the record.
- Select the Team Member to Assign
- Click Save
